Squashing Git commits
In Git you can revise your commit history before pushing your changes to a remote repository. This comes in handy whenever you want to group certain changes together, edit commit messages, or change the order of commits.
The golder rule
Squashing commits is an operation which rewrites the history of a git branch, so it should be performed only on a local branch. In other words, never squash commits on a public branch.
Why is it useful?
When using a version control system like git, it’s often considered a good practice to commit early and often. The problem with this approach is that you might end up with a history full of tiny little commits that aren’t really that meaningful by themselves. You can solve this issue by squashing all commits related to a single topic into a single commit, and write a good commit message which explains what you implemented with your changes. If you do so, you’ll end up with a leaner and more meaningful branch history.
Squashing commits is a great way to group certain changes together before sharing them with others.
Let’s imagine that you are working on a particular feature and as soon as you have some meaningful changes (e.g. a function) you would like to commit them. If you have already decided that you will squash some commits later on, you could commit some code without having to worry about writing a good commit message. For example you could write a message like WIP on new feature, because you know that this message will never make it to the branch history (WIP = Work In Progress). After several “WIP commits” you can squash them together into a single one, and write a good commit message for it.
How is it done?
There isn’t a git squash command. Squashing commits is an operation which can be performed in several ways by using other commands. I’m aware of 3 ways to do it:
- reset
- rebase
- merge
1. Reset
This is the easiest approach. I first heard about this method here. You just have to start with a clean working tree and run git reset --soft HEAD~X, where X is the number of commits to squash together.
Let’s make a simple example to see how it works.
After some specific commit (Initial commit in the image below) you wrote some changes and you committed 3 times. When you wrote those 3 commit messages you just wanted to save your work, maybe because you had to checkout a different branch and fix a bug, or maybe because you don’t like to use git stash.
Let’s say that with the 3rd “WIP commit” you have concluded your work on the new feature and you would like to wrap your changes up and start working on a different topic. This is what you should see with gitk:

Make sure that you have a clean working tree and run:
git reset --soft HEAD~3This is the current situation: the changes are staged, but not yet committed.
Commit these changes, and this time write a meaningful commit message.
Notice that now that you have moved the HEAD, all changes done in the 3 “WIP commits” are no longer in the branch history, because you have just rewritten it. That’s the reason why you should never squash commits on a branch where other developers are working.
2. Rebase
The rebase approach is a bit more complex but offers a much greater flexibility. You are no longer limited to squash all of your changes into a single commit, but you can squash X commits together into any number of commits between 1 and X-1. You can also change the order of commits!
The command you are looking for is git rebase -i HEAD~X.
Once again, let’s pretend that you have 3 commits and you would like to squash them into one.

Use git rebase to carry on the squashing procedure.
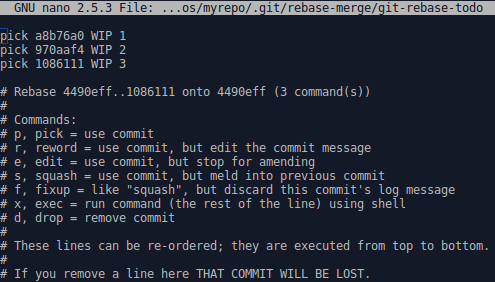
git rebase -i HEAD~3Now the default editor will display a message like the following one:

Since you want a single commit to appear in the branch history, you have to use one commit and squash the remaining two.
In this image the last commit is the third one from the top, but you don’t want to keep that. You want to keep the first commit (the oldest one), and then squash the second one and the third one together into it. I must admit that I find it a bit counterintuitive and it took me a while to get used to it. If this sounds a bit weird to you, don’t worry, because if we mess up we can still revert to the original situation with git rebase --abort.
In this specific example I wrote a meaningless message for the first commit (WIP 1), so I will reword it. If the commit message is fine, you can simply pick the commit. The other 2 commits will be squashed with squash.
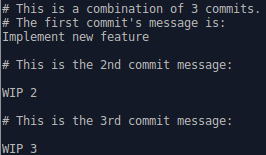
When you accept the changes (Ctrl + X in Nano, Esc then :wq in Vim) you will see a recap like this one:

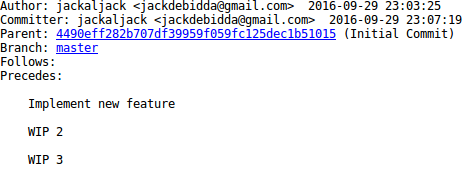
You can also edit this recap, which will appear in the commit description. Save your changes for this recap message. In gitk you should see something like this:

3. Merge
I must admit I’ve never tried this approach. It looks overly complicated and uses a git reset, so it’s probably the riskiest option of the three. Anyway, this is where I found it:
squash-merge.